

Does a WordPress developer need to know Webpack?
You might think it is unnecessary and too complex. So I will show you how useful it is for developing a theme.
TABLE OF CONTENTS
1. What is Webpack
2. How to Install / Setup Webpack?
3. Compiling CSS / Sass
4. CSS Live Reload
5. Getting JS Library from NPM
1. What is Webpack?
Webpack is a command-line tool to allow the use of JavaScript modules. This is a feature that is quite a pain to do without Webpack.
For example, we have app.js that needs 2 libraries: js-datepicker.js and swiper.js. In the old way, you would enqueue them separately resulting in this output:
<script src="/wp-content/themes/mytheme/js/js-datepicker.js">
<script src="/wp-content/themes/mytheme/js/swiper.js">
<script src="/wp-content/themes/mytheme/js/app.js">
With Webpack, we can use import to embed the libraries inside app.js. All the codes are now combined into one file:
import datepicker from './js-datepicker.js';
import swiper from './swiper.js';

// do something
<!-- Now only need to enqueue 1 file -->
<script src="/wp-content/themes/mytheme/dist/app.js">This seems like a minor benefit but it will become more apparent when you have a lot of files. Moreover, Webpack has many other utilities such as:
- Minify your code
- Compiling Sass into CSS
- Auto reload your CSS as you save
- Allow use of advanced syntaxes for your Vue or React code.
- etc
In this tutorial, we will learn to do the first three of that list.
2. How to Install / Setup Webpack?
- Download and install Node JS. Pick the recommended version.
- Create
package.jsonandwebpack.config.jsfiles in your theme and paste in the code below:
{
  "name": "my-theme",
  "private": true,
  "dependencies": {},
  "devDependencies": {
    "browser-sync": "^2.26.12",
    "browser-sync-webpack-plugin": "^2.2.2",
    "css-loader": "^4.3.0",
    "file-loader": "^6.1.0",
    "mini-css-extract-plugin": "^0.11.2",
    "sass": "^1.53.0",
    "sass-loader": "^10.0.2",
    "url-loader": "^4.1.0",
    "webpack": "^4.44.1",
    "webpack-cli": "^3.3.12"
  },
  "scripts": {
    "build": "webpack --mode production",
    "dev": "webpack --mode development --watch"
  }
}
const MiniCssExtractPlugin = require('mini-css-extract-plugin');
const BrowserSyncPlugin = require('browser-sync-webpack-plugin');
var path = require('path');

// change these variables to fit your project
const jsPath= './js';
const cssPath = './css';
const outputPath = 'dist';
const localDomain = 'http://mysite.local';
const entryPoints = {
  // 'app' is the output name, people commonly use 'bundle'
  // you can have more than 1 entry point
  'app': jsPath + '/app.js',
};

module.exports = {
  entry: entryPoints,
  output: {
    path: path.resolve(__dirname, outputPath),
    filename: '[name].js',
  },
  plugins: [
    new MiniCssExtractPlugin({
      filename: '[name].css',
    }),

    // Uncomment this if you want to use CSS Live reload
    /*
    new BrowserSyncPlugin({
      proxy: localDomain,
      files: [ outputPath + '/*.css' ],
      injectCss: true,
    }, { reload: false, }),
    */
  ],
  module: {
    rules: [
      {
        test: /\.s?[c]ss$/i,
        use: [
          MiniCssExtractPlugin.loader,
          'css-loader',
          'sass-loader',
        ],
      },
      {
        test: /\.sass$/i,
        use: [
          MiniCssExtractPlugin.loader,
          'css-loader',
          {
            loader: 'sass-loader',
            options: {
              sassOptions: { indentedSyntax: true },
            },
          },
        ],
      },
      {
        test: /\.(jpg|jpeg|png|gif|woff|woff2|eot|ttf|svg)$/i,
        use: 'url-loader?limit=1024',
      },
    ]
  },
};
The code above assumes your theme’s structure looks like below. If it’s different, change the variables in Line 5 accordingly:
/
├── css/
│   ├── app.css
├── js/
│   ├── app.js
├── dist/
├── index.php
├── page.php
├── ...- Open command-prompt / terminal in your theme and run the command below. For Windows users, you might see an error saying unable to remove the directory. Simply rerun the command to solve that.
npm install- To start compiling, run the command below. Every time you save your JS, it will automatically re-compile.
npm run dev- Before launching, you need to minify the code. To do this, you need to quit the
devcommand, then run:
npm run build3. Compiling CSS or Sass
By default, Webpack only supports JS files. But if you followed our setup above, it has extra packages to handle CSS or Sass.
There are 2 ways of compiling them. The first way is to directly import them in your JS:
import '../css/style.sass'

// ...
The second way is to add a new entry point in your config:
// ...

const entryPoints = {
  'app': jsPath + '/app.js',
  'style': cssPath + '/style.sass',
};

// ...
The first way makes more sense if the CSS is related to the script.
Note: If you get this error: ENOENT no such file or directory, scandir, you can fix it by running the command npm rebuild node-sass.
4. CSS Live Reload
Whenever you save your CSS, Webpack will automatically reloads it.
You are probably using other tools to do this, but it’s nice to have everything in one place.
We have included the packages to handle this in our current setup. Simply do these 2 steps in your webpack.config.js to enable it:
- Update
localDomainvariable to be the local domain you use for your project. - Uncomment the
new BrowserSyncPluginblock.
To launch it, use the same command:
npm run dev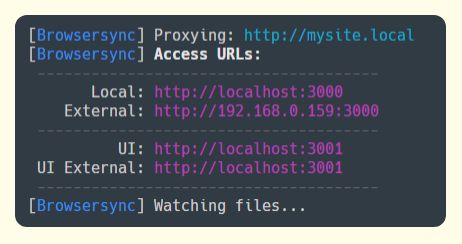
If you open your site in localhost:3000, any updated CSS will be reloaded.
Also, do you notice the External URL? You can open that on your mobile phone to view your local site! As long as both your computer and phone are under the same Wi-Fi.
Note: Depending on your router setup, the External URL might not work. I’m not familiar with networking stuff, so I don’t know the fix. Let me know in the comment if you found one.
5. Getting JS Library from NPM
Most popular JS libraries are available in NPM. So you don’t need to save a local copy in your theme.
Simply Google it to know whether it’s available as NPM or not.
In our example, js-datepicker and swiper is available as NPM. So we can install them by running these 2 commands (in your theme directory):
npm install --save js-datepicker

npm install --save swiper
Now, we update their import references from this:
import datepicker from './js-datepicker.js';
import swiper from './swiper.js';
Into directly using the package’s name:
import datepicker from 'js-datepicker';
import swiper from 'swiper';
Conclusion
I hope this convinces you to start using Webpack in your project. Unless you’re doing minimal customization to a theme, this will serve you well.
There are limitless possibilities with what you can do with Webpack. I believe this tutorial is good enough for you to be able to experiment further.
Leave a comment below if you have any question regarding Webpack. I’m not a pro at it, but will try my best in answering yours.


Very clear, simple and efficient. I had to adjust the output so it doesn't end up in the dist directory and it's working fine. The live reload is a nice cherry on top! Thank you!
Thank you, this is a great and simple explanation! I actually want to try using webpack now, I read countless other articles and thought it would be too complicated.
Thank you for this tutorial! Very clear and straightforward. It did exactly what I needed it to do.
Love this guide, use it all the time. One question though. I use your package.json dependencies list which has approx. 15 dependencies list. However once initialised I have LOADS (hundreds) of node modules in my node_modules folder. Is this normal? why is this? are they needed?
Thanks!
Hi Lew,
Yes, each dependencies also dependant on something else, so you need to download everything.
Don't worry about the node_modules folder as you don't need to upload that to the live server.
Lew, don't forget to add the node_modules folder to your git ignore file (.gitignore)
What about cache busting?
Hi Michael,
I do cache busting natively in WordPress during the enqueue process. I usually has a constant with the Theme version like this:
Then when enqueuing, you do:
Unfortunately, this means we got to increment the Theme version in
style.csseverytime there is changes. There is definitely a more automated way for this.I do the following to set the version based on the css filetime. It's not as good as doing a content based version, but it works for my scenario.
Thanks for sharing! This sounds like a good solution. Never thought of doing this before.
Hello, just use [contenthash] in the output:
module. exports = { entry: entryPoints, output: { path: path. resolve(__dirname, outputPath), filename: '[name].[contenthash].js', },... ... }
Hey, thank you for nice explanation, may be you could help me to understand how i need to act - i am trying to bundle files in plugin i developing and installed node files into plugins folder, also in the same folder i placed file with config and package.json - the problem when i run command build in command line i am getting an error that it does not see node files. thank you
Hi Elena, it seems you haven't installed the packages. Run the command
npm installfirst.The package.json needs to be inside that specific plugin's folder too
Very clear, Simple And Great , Can we use css modules too in our wordpress project ? i tried to edit webpack config but i have no luck
Hi, My current webpack config supports CSS modules. It will be outputted as CSS file with the same name as the JS. Simply change the directory and file name to fit your project