


Creating a custom block isn’t an easy feat especially if you are not comfortable with pure JavaScript. Hopefully, this guide can help you with that.
Before Making Custom Block
First, ask this question before wasting time creating a redundant block:
“Is there an existing block that fits your need?”
For example, I once need to create this design in Gutenberg:

The general layout can be achieved with Media-Text block. But there’s no option to create a colored box behind the image. We also don’t have an option to add five stars below the Heading.
So we create 2 custom styles, one for Media-Text, and one for Heading:
register_block_style('core/media-text', [
  'name' => 'half-bg',
  'label' => 'Half Background'
]);

register_block_style('core/heading', [
  'name' => 'has-stars',
  'label' => 'Has Stars'
]);
Now we can use pseudoselector ::before and ::after to create that design like this:
.wp-block-media-text.is-style-half-bg {
  position: relative;
}
.wp-block-media-text.is-style-half-bg::before {
  content: "";
  position: absolute;
  top: 0;
  left: -3rem
  bottom: 0;
  width: 50%;
  background-color: #eee1cc;
}

h1.is-style-has-stars::after,
h2.is-style-has-stars::after,
h3.is-style-has-stars::after {
  content: "★★★★★";
  order: 2;
  display: block;
  width: 100%;
  font-size: 14px;
  letter-spacing: 2px;
  color: #ba9556;
}
If none of the existing blocks fits your need, continue the tutorial below.
1. Register Assets & Block Type
This tutorial uses this directory structure, adapt it according to your theme:
my-theme/
├─ css/
│  ├─ my-block.css
│  ├─ ...
├─ js/
│  ├─ my-block.js
│  ├─ ...
├─ functions.php
├─ ...my-block.jsis for the admin editor.my-block.cssis for both the front end and the admin editor.
Now let’s enqueue them:
add_action('wp_enqueue_scripts', 'my_enqueue_assets');
add_action('enqueue_block_editor_assets', 'my_enqueue_block_assets');
function my_enqueue_assets() {
$css_dir = get_stylesheet_directory_uri() . '/css';
wp_enqueue_style('my-block', $css_dir . '/my-block.css', []);
}
function my_enqueue_block_assets() {
$css_dir = get_stylesheet_directory_uri() . '/css';
$js_dir = get_stylesheet_directory_uri() . '/js';
// If in plugin, use this instead:
// $css_dir = plugin_dir_url(__FILE__) . 'css';
// $js_dir = plugin_dir_url(__FILE__) . 'js';
wp_enqueue_script('my-block', $js_dir . '/my-block.js', [ 'wp-blocks', 'wp-dom' ] , null, true);
wp_enqueue_style('my-block', $css_dir . '/my-block.css', [ 'wp-edit-blocks' ]);
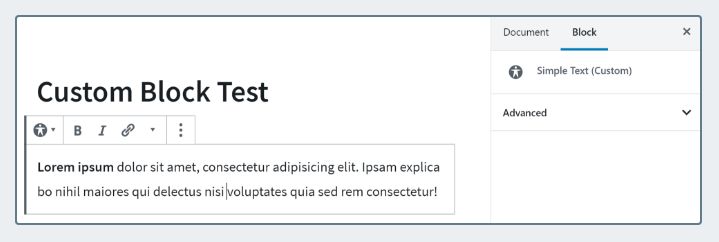
}2. What We Are Building
We will build a simple text field. It’s pretty much useless since we have Paragraph block, but this is just to introduce you to the syntax:
3. The Script
Gutenberg uses a library called React. If you are not familiar with it, the code below will look taunting. But don’t worry, we will explain it the best we could.
(() => {
  const el = window.wp.element.createElement;
  const { registerBlockType } = window.wp.blocks;
  const { RichText } = window.wp.blockEditor;

  registerBlockType('my/simple-text', {
    title: 'Simple Text (Custom)',
    icon: 'universal-access-alt',
    category: 'layout',
    attributes: {
      content: {
        type: 'array',
        source: 'children',
        selector: 'p',
      },
    },
    edit: myEdit,
    save: mySave
  });

  // what's rendered in admin
  function myEdit(props) {
    const atts = props.attributes;

    return el(RichText, {
      tagName: 'p',
      className: props.className,
      value: atts.content,

      // Listener when the RichText is changed.
      onChange: (value) => {
        props.setAttributes({ content: value });
      },
    });
  }

  // what's saved in database and rendered in frontend
  function mySave(props) {
    const atts = props.attributes;

    return el(RichText.Content, {
      tagName: 'p',
      value: atts.content,
    });
  }
})();
Let’s break down the code:
SELF INVOKING FUNCTION
(() => {
  ...
})();
This wrapper is used to enclose our code. So any variables or functions defined here won’t leak to the outside.
WP BLOCKS LIBRARY
const el = window.wp.element.createElement;
const { registerBlockType } = window.wp.blocks;
const { RichText } = window.wp.blockEditor;
Gutenberg already provided us with many reusable functions and elements such wp.blockEditor.RichText.
The code above is just re-assigning the variable so it’s easier to use later.
REGISTER BLOCK
registerBlockType('my/simple-text', {
  title: 'Simple Text (Custom)',
  icon: 'universal-access-alt',
  category: 'layout',
  attributes: {
    content: {
      type: 'array',
      source: 'children',
      selector: 'p',
    },
  },
  edit: myEdit,
  save: mySave
});my/simple-text– The block’s slug. This will translate into the wrapper’s class name like “wp-block-my-simple-text”.title– Is what appears when selecting the block.icon– Click here for a list of available icons.attributes– List of variables for the block.sourceandselectordefines how to extract the value from saved content. More info»edit– Callback on how to render the content in the editor.save– Callback on how to render the content before saved to the database.
EDIT
function myEdit(props) {
  const atts = props.attributes;

  return el(RichText, {
    tagName: 'p',
    className: props.className,
    value: atts.content,

    // Listener when the RichText is changed.
    onChange: (value) => {
      props.setAttributes({ content: value });
    },
  });
}
Edit function returns the elements that are rendered in Gutenberg. Here’s the breakdown:
el(...)– create an HTML element.RichText– a special element from Gutenberg. It’s like<input type="text">but has a toolbar to bold, italic, anchor link, etc.tagName– wraps the RichText with<p>.value– uses thecontentvariable we defined inattributesas the value of this RichText.onChange– updates thecontentvariable as we type.
SAVE
function mySave(props) {
  const atts = props.attributes;

  return el(RichText.Content, {
    tagName: 'p',
    value: atts.content,
  });
}
The HTML returned here is saved into the database. In turn, this is also what is shown on the front end.
4. The Style
Our custom block is just a standard field text, so the CSS is just this:
.wp-block-my-simple-text {
border: 1px solid rgba(0,0,0,.1);
padding: 1rem;
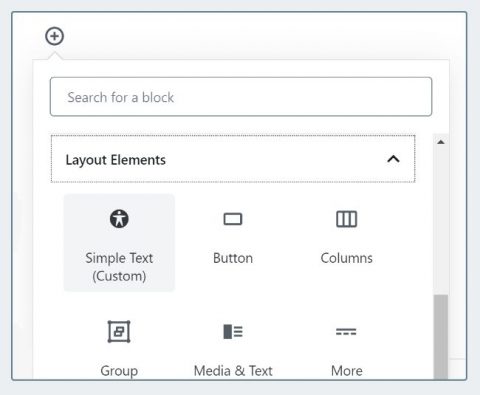
}Done! Go check out your block in the editor. You should see your custom block listed like this:
Conclusion
Creating a custom block is difficult and can get ugly. So try to use a custom block style as shown above whenever possible.
If you are interested to learn more, we made an extensive tutorial on our Github. It also included the code with React JSX syntax:
Feel free to leave a question below regarding custom block 🙂
Note: This article is originally written in March 2019. It has been updated to reflect the standard way in the latest WP version.


Shouldn't the path to the file in point 2 and 3 be '/assets/js/my-block-admin.js' - same as enqued scripts file?
Hi Bart, thanks for noticing the mistake. I have fixed it
[…] The JS is long and complex, so copy it from our gist. If you want to learn the syntax, check out our other tutorial. […]
I literally copied and pasted and it's not working on my website.
Is there something else I need to do?
Hi, your theme folder structure probably different from mine
Hi Henner,
I copied the way you posted it on the website. It's the same structure, I'm using the 2020 theme.
Hi, I received your email containing more detail about the error. It might be because you're in a child theme and therefore need to use
get_template_directory_uri()instead ofget_stylesheet_directory_uri()when enqueuing it.If you still have trouble, we can continue the conversation in email. Thanks
This doesn't work. All it does is show an icon. I have a feeling lots of steps are missing. Are there suppose to be .css files? If so, what for? This kind of coding is new to a lot of people, if you know more, it would be nice to share or at least point people to the right recourses.
Hi Cathy, I think your JS and CSS aren't enqueued. Make sure the directory and file name point to your CSS and JS file.
I will make an edit to explain some stuff further. Thanks for the input.
You can also refer to this Github repo containing all the Gutenberg tutorials I wrote: https://github.com/hrsetyono/gutenberg-tutorial
It's a working plugin, so you can install it and check out the blocks.
I have this error : "props is not defined" ?
Hi, I have changed the code snippet to fix that error. Thanks for pointing it out