

This is a complete guide to install a WordPress site in DigitalOcean.
It took me quite long to successfully move this website to DigitalOcean. I was frustrated with how complex most tutorials are.
So I wrote this to help fellow beginners.
Let’s get started!
Table of Contents
CHAPTER 1
What is DigitalOcean and Why Use it?
DigitalOcean is a self-managed hosting. We are given a Linux server and we can configure it ourselves, mostly via command line.
That does sound intimidating. But in return, we got a cheap and fast server.

How much faster?
We did a GTMetrix comparison between this site (hosted in DigitalOcean) and an exact copy of it in my shared hosting. Here’s the result:

(Right) This site in DigitalOcean
The load time went from 1.8s to 1.0s which is an amazing 44% improvement.
Of course, the improvement will vary depending on your current hosting. But my shared hosting is not a cheapskate one.
Also, I’m not sure why the number of requests is different. It’s 100% an exact clone with the same version of themes and plugins. It’s probably the Redis cache in DigitalOcean.
Interested to achieve that result? Let’s make a preparation.
CHAPTER 2
SSH Key
We will learn how to generate key-pair. You can skip this if you already have your Public and Private Key.
Note: This chapter assumes you are on Windows machine
Beginner Tip: How to Open Command Prompt
- Right-click on Windows Menu (bottom-left corner) and select “Command Prompt”
or - Press Windows Key, type in “cmd” to search for it.
How to open command prompt in a specific folder:
- In the command prompt, type in
cd C:\path\to\folder.
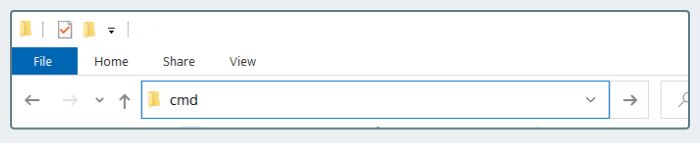
or - Type in
cmdin the address bar and press Enter (see image below)
If you are on Windows 8 or lower, you need to install Git Bash and use that as CMD replacement.
Generate SSH Key
Key Pair is a method to set our computer as a trusted source to the server so we don’t need a password to enter it.
To generate them, go to C:/Users/yourname/ and create a folder named .ssh. Open command prompt in that folder and run this command:
ssh-keygen -t rsaJust press ENTER to skip any prompt and you will get 2 new files:
id_rsawhich is the Private keyid_rsa.pubwhich is the Public key.
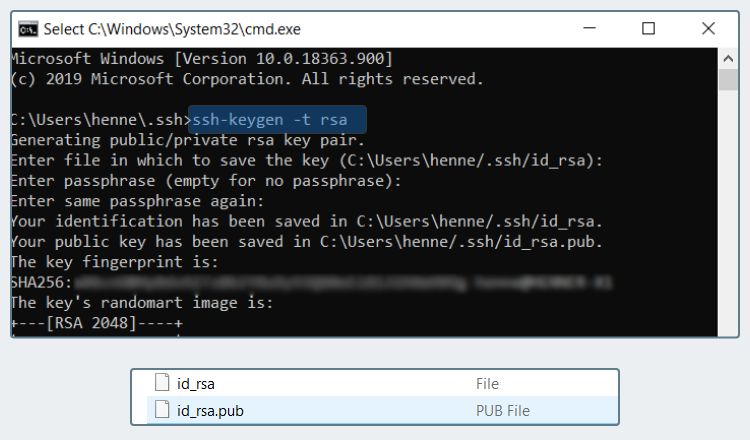
ssh-keygen to generate keysNever share or commit your Private Key! Anyone who has that file will get full access to your server.
Now you are ready to enter DigitalOcean.
CHAPTER 3
Creating a Droplet
Droplet is an alias of server in DigitalOcean.
This chapter will guide you through the creation process and our recommended settings.
First, register an account at DigitalOcean.com and you will be asked to create a droplet.

Droplet Settings

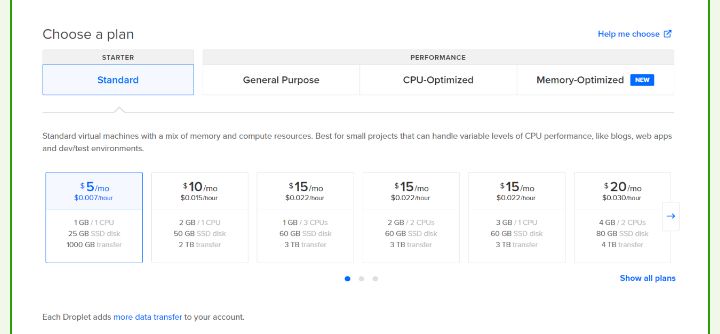

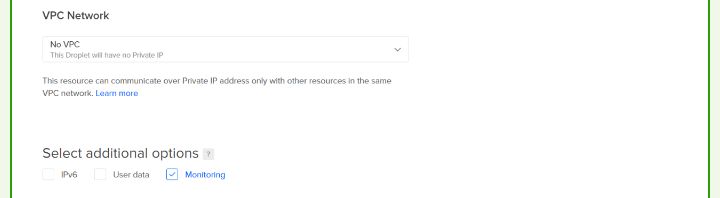
Tick “Monitoring” in additional options.

id_rsa.pub)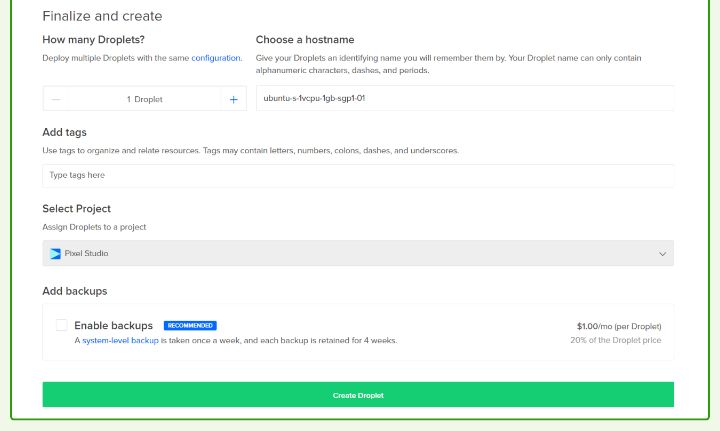
If your site is rarely updated, I recommend enabling the weekly Backups.
Important! Check If You Get a Blacklisted IP Address
After your droplet is created, paste in the given IP Address to https://mxtoolbox.com/blacklists.aspx.
Sometimes you get a faulty IP that has been used for email spam in the past. If you keep that IP Address, your email from @yourdomain.com is more likely to go to the Spam folder.
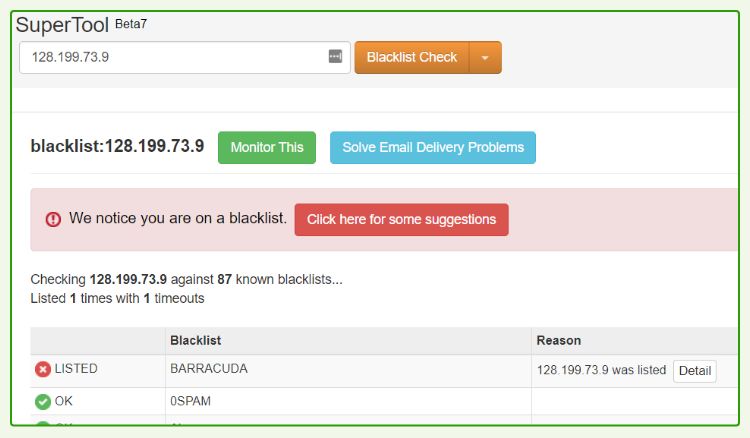
If it is blacklisted in just 1 source, destroy and recreate the droplet. Repeat until you get an IP that’s 100% clean.
Setup Domain
In DigitalOcean panel, click the triple dots besides your droplet and then select “Add a domain”.
Then change your domain’s nameserver into whatever shown in the DNS Record. At the time of this writing, they are:
ns1.digitalocean.com
ns2.digitalocean.com
ns3.digitalocean.com
If your domain is in Cloudflare, change the A record to point to the droplet’s IP Address. After that, change your SSL encryption setting to “Flexible”.

Later after the WordPress is installed, add the plugin Cloudflare Flexible SSL to fix CORS (Cross Origin) error.
I’ve been searching for how to make Cloudflare’s Full SSL works in DigitalOcean to no avail. Let me know in the comment if you know a way 🙂
Now that you have a server, let’s install WordPress in it.
CHAPTER 4
Creating a WordPress Site
You will have a WordPress site at the end of this chapter. Finally!
But you need to earn that by going through a bunch of command lines.
Don’t be afraid and don’t forget to replace some strings like 1.2.3.4 to fit your droplet’s IP address.

Create a Super User
We need to create a user that has less privilege than root so it’s safer during setup.
Open CMD and run these commands one by one (ignore the line that’s started with #):
# Connect to server
# - you will be prompted "The authenticity of host...", type "yes"
ssh [email protected]

# Create a new user
# - you will be prompted to create a password
adduser yourname

# Assign admin privilege
# - allowed to run 'sudo' but need to re-enter password
usermod -aG sudo yourname

# Copy the .ssh folder to your new user
rsync --archive --chown=yourname:yourname ~/.ssh /home/yourname

# Allow that user to modify website files
adduser yourname www-data
Install WordOps
WordOps is a command-line toolset used to manage your own WordPress server. Without it, this tutorial will be 5x longer.
Open your command prompt and run these commands:
# Connect with the new user
ssh [email protected]

# Download & install WordOps
wget -qO wo wops.cc && sudo bash wo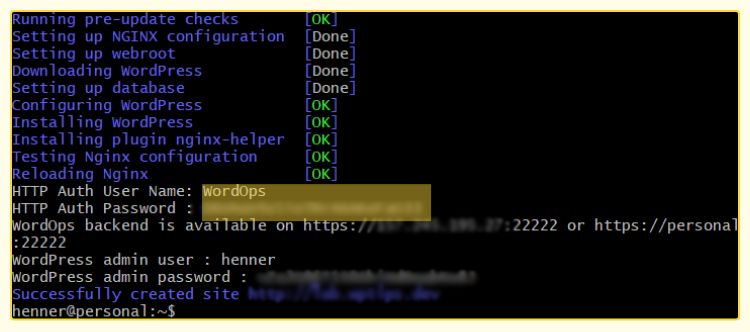
Take note of the highlighted username and password from the image above. It will be used to access the control panel later.
Next, install WordOps add-ons which includes phpMyAdmin, WP-CLI, SendMail, etc:
# Install default add-ons
sudo wo stack install

# Install firewall add-on
sudo wo stack install --ufw

# Always allow SSH Access
sudo ufw allow 22

# Restart server
sudo service ssh restart
Install WordPress
Run the commands below and don’t forget to replace some strings to fit your project:
# Create a WP site
# - the nameserver must finish propagating first (check here https://www.whatsmydns.net/)
sudo wo site create yoursite.com --wpfc --letsencrypt --php74 --user=yourname [email protected]

# Allow editing via FileZilla
sudo chmod -R 775 /var/www/yoursite.com
Done! Visit your site in browser and you will see the default WordPress site there.
To see more available configuration such as creating a Multisite, visit WordOps Official Documentation.
You’re not done yet! You still haven’t learned how to access the files and database.
CHAPTER 5
Site Management
If you come from shared hosting, you must be familiar with the name FileZilla and phpMyAdmin.
They are very common tools to access your files and database.
We will learn how to use them in DigitalOcean.

Accessing Your Files with FileZilla
You need to configure FileZilla to be able to connect via SSH.
Open FileZilla > Edit > Settings. Then in the sidebar, choose Connection > FTP > SFTP. Click “Add key file” and link your Private Key (id_rsa).

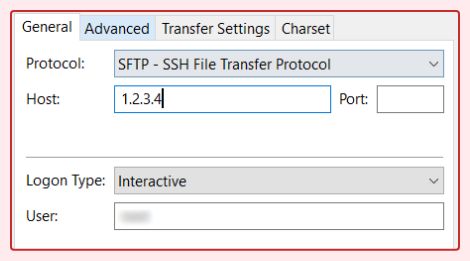
Now you can connect using this site’s configuration:
- Protocol: SFTP – SSH File Transfer Protocol
- Host: The droplet’s IP Address
- Port: 22
- Logon Type: Interactive
- User: yourname
Click “Connect” and click “OK” to trust the key. Navigate to /var/www to find all the WordPress files.
Entering the Control Panel
Your control panel resides within the IP Address of your droplet with :22222 appended to it. For example http://1.2.3.4:22222.
You will get a Privacy Error page. For now, ignore that and click Advanced > Proceed.
Use the username and password you got when installing WordOps in Chapter 4.
You didn’t take note of it? Then you need to connect via SSH and reset the password with this command:
sudo wo secure --authAfter login, you will be met with a bright dashboard like this:

You will see many stats such as RAM Usage and Memory Allocation. But we’re here to access the database.
Accessing Database with phpMyAdmin
From Control Panel, click Database and choose phpMyAdmin.
If you feel experimental, try Adminer. It’s a simpler and faster alternative to phpMyAdmin. You can freely rotate between those two, so no worries.
Now you need to enter the DB username and password which you can find in /etc/mysql/conf.d/my.cnf (Use FileZilla to open that file).
That’s all the important thing to know. It should be enough to manage most WordPress sites.
Conclusion
Thank you for reading. I hope you find this tutorial useful.
There is another topic I would like to cover: Auto-deployment. But it’s getting too lengthy, so I will put that for a future tutorial.
If you have a problem or question, do share it in the comment below. I will try my hardest to answer them 🙂

Sorry but why do you make the superuser before install Wordops, don’t their script include user creation in Ubuntu?
And did you compare with Slickstack script, can you give opinion?
Hi Parvej, I just checked the user list in my server and there's no user that seemingly created by wordops.
I haven't used slickstack, but their website does not give me confidence of using it.
Hi,
WordOps recommends setting up hostname (https://docs.wordops.net/getting-started/prerequesites/#server-configuration-recommendations). Can you please tell me what's the use of it, and why haven't you done it in the post.
Awesome post btw.
Hi Legen, very sorry for the late reply. I usually receive an email notification whenever there's a new comment but for some reason, I didn't get any.
The reason why I didn't include it is because it's not that important. You can still access the server with IP address. It's good to have, but I want to keep my guide as short as possible.