CSS Variable has taken the frontend development by storm. I was skeptical of it because I’m used to Sass variable. But after a while, I realized how powerful it is.
Here are 3 use cases of CSS Variable in WordPress:
1. Fixed Header and Admin Bar

You don’t want your fixed header to cover up the admin bar. So what you did is probably something like this:
.site-nav {
  position: fixed;
  top: 0;
  ...
}

body.admin-bar .site-nav {
  top: 32px;
}

@media (max-width:782px) {
  body.admin-bar .site-nav {
    top: 48px;
  }
}
With CSS Variable, you can simply define the Admin Bar’s height and set it to 0 if it doesn’t exist:
:root {
  --adminbarHeight: 0px;
}

body.admin-bar {
  --adminbarHeight: 32px;
}

@media (max-width:782px) {
  body.admin-bar {
    --adminbarHeight: 48px;
  }
}

.site-nav {
  position: fixed;
  top: var(--adminbarHeight);
  ...
}
If you have other elements that need to be pushed down, you can reuse that variable.
2. Page Theme Color
In WPTips website, do you notice that every page has a theme color according to the category?

Here’s how I achieve this:
First, add the category to your body class:
add_filter( 'body_class', 'add_category_to_single_post' );

function add_category_to_single( $classes ) {
  if (is_single() ) {
    global $post;
    foreach( ( get_the_category($post->ID) ) as $category ) {
      $classes[] = 'category-' . $category->term_id;
    }
  }

  return $classes;
}
In your CSS, define the color for each category:
/* Category A */
body.category-10 {
  --themeColor: #1976d2;
  --themeColorDark: #145da7;
  --themeColorLight: #e3f2df;
}

/* Category B */
body.category-12 {
  --themeColor: #2f9c0a;
  --themeColorDark: #2e7d32;
  --themeColorLight: #f1f8e9;
}

...
Now you can use those variable wherever you see fit:
.post-banner { background-color: var(--themeColorLight); }

.category-label { background-color: var(--themeColor); }

.button { background-color: var(--themeColor); }
.button:hover { background-color: var(--themeColorDark); }
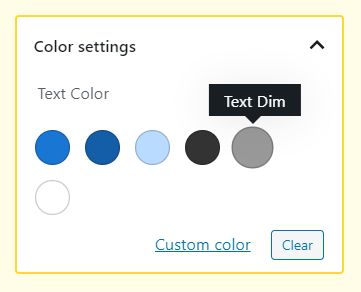
3. Gutenberg Palette
You can register CSS Variable as color palette like this:
add_action( 'after_setup_theme', function() {

  add_theme_support( 'editor-color-palette', [
    [
      'name' => __( 'Main Color' ),
      'slug' => 'main',
      'color' => 'var(--main)',
    ],
    [
      'name' => __( 'Main Color Dark' ),
      'slug' => 'main-dark',
      'color' => 'var(--mainDark)',
    ],
    [
      'name' => __( 'Main Color Light' ),
      'slug' => 'main-light',
      'color' => 'var(--mainLight)',
    ],
    [
      'name' => __( 'Text Color' ),
      'slug' => 'text',
      'color' => 'var(--text)',
    ],
    [
      'name' => __( 'Text Dim' ),
      'slug' => 'text-dim',
      'color' => 'var(--textDim)',
    ],
    [
      'name' => __( 'Text Invert' ),
      'slug' => 'text-invert',
      'color' => 'var(--textInvert)',
    ],
  ]);

}, 100 );
Then you need to enqueue the CSS that defines those colors:
add_action( 'enqueue_block_editor_assets', function() {
  if ( !is_admin() ) { return; }

  $css_dir = get_stylesheet_directory_uri() . '/css';
  wp_enqueue_style( 'my-gutenberg', $css_dir . '/my-gutenberg.css', [ 'wp-edit-blocks' ] );

}, 100 );
:root {
--main: #1976d2;
--mainDark: #145da7;
--mainLight: #b9dbff;
--text: #333333;
--textDim: #999999;
--textInvert: #ffffff;
}Done! Your colors should be registered in Gutenberg.

This tip is very useful if you are using pre-compiler like Sass so you can share the same Setting file.
Conclusion
The tips above only scratch the surface on what CSS Variable is capable of. Expect more articles about this in the future!
If you have any question regarding CSS Variable, let me know in the comment below 🙂


