


There are many page builders already out, but I personally think that Elementor is better in every way. As a developer, I cannot describe the convenience this plugin provides.
Before Elementor, if my clients would have a requirement for the custom design, I had to create a custom theme for them which is heavy on cost and time. Typically, clients are short on budget and I would be in a difficult situation.
Elementor Pro has a Theme Builder which makes it very easy for us to create a custom design theme as per the client’s requirement and in a very cost-effective way. Now I use Elementor for most of the projects.
But… But…
Nothing is perfect in this world. There will always be a case in which the widget or the addons you are using does not match your required design.
In this tutorial, we are going to learn the process of how to solve such problems. Let’s start!
Use-case:
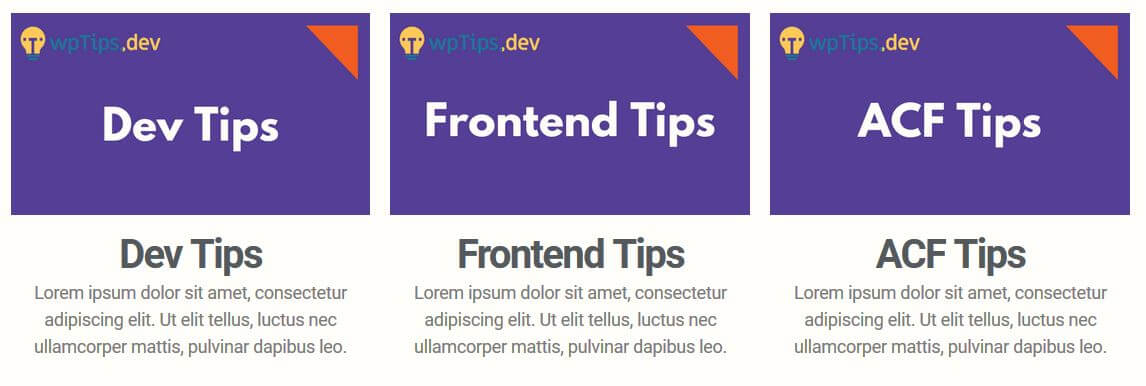
The scenario is that we have a website with the Elementor plugin installed. We want to create a section on the homepage which will have 3 columns each including a thumbnail image, a title, a subtitle, and some description.
Now, we will find the Elementor widget which is a close match to our design. Fortunately, we found one – the default Image Box. Image Box will allow us to have a thumbnail image, a title, and a description.
Below is what we can achieve using the default Image Box:
But we need a subtitle field. This is what we want to finally achieve:
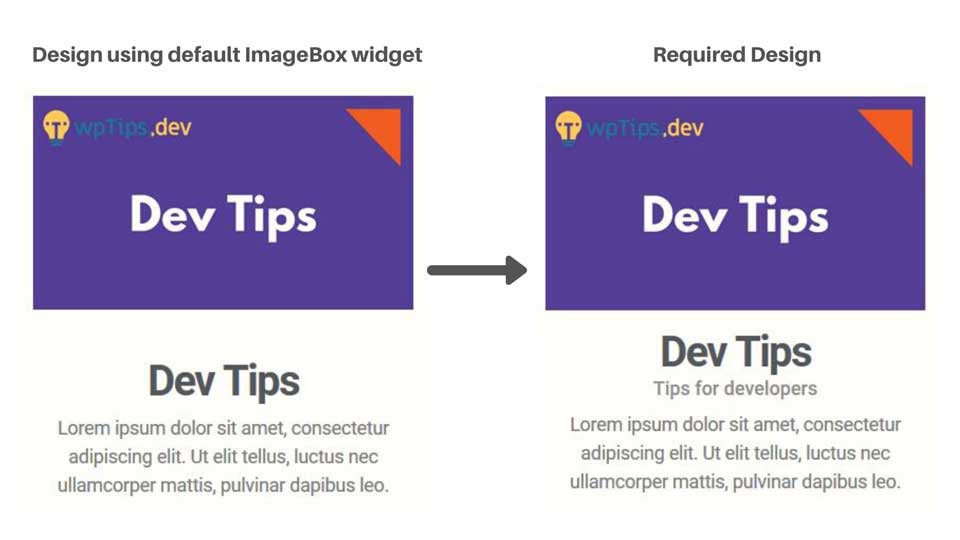
The option to add the subtitle is not available in the default Image Box widget. If the description field would have been a WYSIWYG editor you could have added the subtitle in it and created a similar design. But it’s a normal text box.
You can, of course, create the same design by using separate widgets and then stack them together but if you are like me who needs strong solutions, below is the process for you.
Let’s build this step by step.
Step 1: Create an Extension containing the Copy of Image Box Widget
We don’t want to modify the plugin’s code directly, so we will need to create a plugin that extends the Elementor Plugin.
Since creating an extension from scratch would make a very long tutorial, we have prepared a starter plugin that already contains the Image Box widget:
If you are interested to learn more, read Elementor’s official doc about the step by step process of creating an extension.
For your reference, these are the necessary steps to copy a default widget into your extension:
- Get the code in Elementor plugin folder >
includes>widgets>image-box.php. - Change the class name, return value of
get_name()andget_title(). Otherwise, there will be a conflict with an old and new widget. - Make sure to use the appropriate namespaces otherwise some classes will not load and you will see a spinner loading in your Elementor Panel. And that won’t give any error which is very hard to debug.
- Then you will need to require this file and register our new widget into
init_widgets()of your main extension file.
Step 2: Check Whether the New Widget is Installed Properly
First, activate the extension plugin. Then create a new page and try adding the new widget which is called “WP Tips Image Box”.
If you can find the new widget, it is time to get dirty with code.
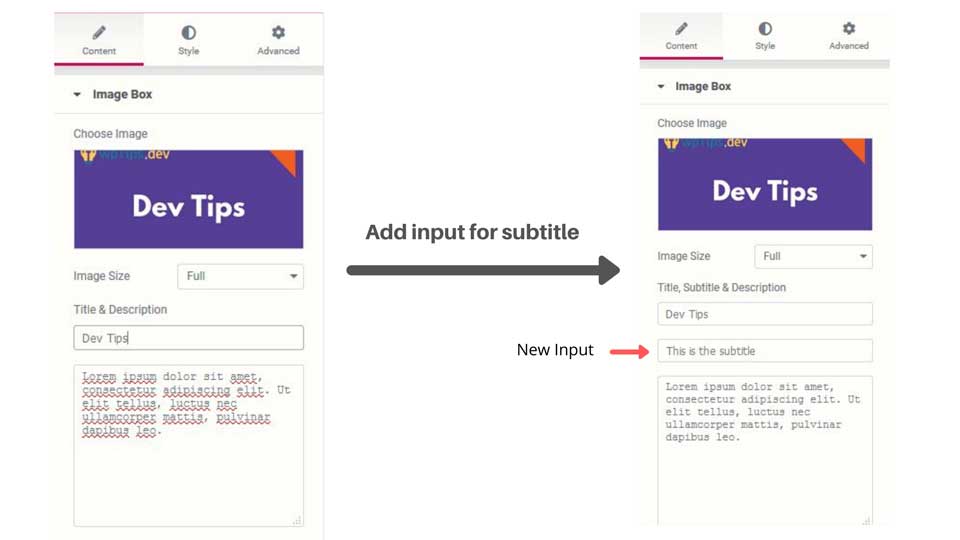
Step 3: Add a new field for Subtitle
We are going to add a new field in “Content” tab as shown in the picture below:
Open image-box.php and look for the code below (around line no. 131):
$this->add_control(
  'title_text',
  [
    'label' => __( 'Title, Subtitle & Description', 'elementor' ),
    ...
  ]
);
After that code, add a control for our new subtitle field:
$this->add_control(
  'subtitle_text',
  [
    'label' => __('Subtitle', 'elementor'),
    'type' => Controls_Manager::TEXT,
    'dynamic' => [
      'active' => true,
    ],
    'default' => __('This is the subtitle', 'elementor'),
    'placeholder' => __('Enter your subtitle', 'elementor'),
    'show_label' => false,
    'label_block' => true,
  ]
);
Save the file and you should see a new subtitle field in your widget.
Now, at the end of the Content tab, you can see that we have an option to set an HTML tag for the title. We need to have the same option for our subtitle too.
Look for the code (around line no. 215):
$this->add_control(
  'title_size',
  [
    'label' => __( 'Title HTML Tag', 'elementor' ),
    'type' => Controls_Manager::SELECT,
    ...
  ]
);
After that code, add a similar option for selecting an HTML tag for the subtitle:
$this->add_control(
  'subtitle_size',
  [
    'label' => __( 'Subtitle HTML Tag', 'elementor' ),
    'type' => Controls_Manager::SELECT,
    'options' => [
      'h1' => 'H1',
      'h2' => 'H2',
      'h3' => 'H3',
      'h4' => 'H4',
      'h5' => 'H5',
      'h6' => 'H6',
      'div' => 'div',
      'span' => 'span',
      'p' => 'p',
      ],
    'default' => 'h5',
  ]
);
Refresh the page and you will see this option at the bottom of the ‘Content’ tab.
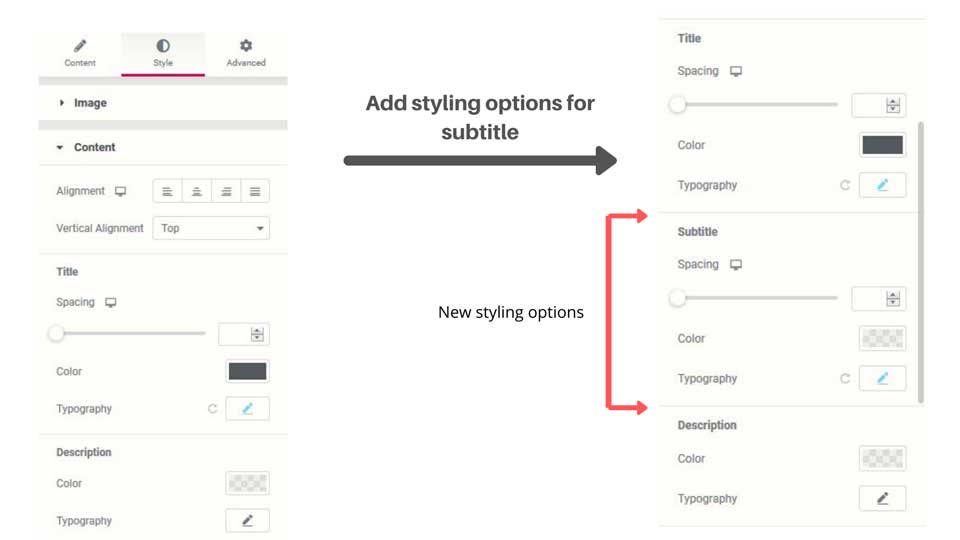
Step 4: Create options to style the subtitle.
If you goto ‘Style’ tab for the new Image Box widget, you will see that we have multiple options to style the title. We need to add similar ones for the subtitle.
Let’s create new style controls for the subtitle. Look for the code below ( around line no. 522):
$this->add_group_control(
  Group_Control_Typography::get_type(),
  [
    'name' => 'title_typography',
    ...
  ]
);
After that code, add similar styling options for the subtitle.
$this->add_control(
  'heading_subtitle',
  [
    'label' => __('Subtitle', 'elementor'),
    'type' => Controls_Manager::HEADING,
    'separator' => 'before',
  ]
);

$this->add_responsive_control(
  'subtitle_bottom_space',
  [
    'label' => __('Spacing', 'elementor'),
    'type' => Controls_Manager::SLIDER,
    'range' => [
      'px' => [
        'min' => 0,
        'max' => 100,
      ],
    ],
    'selectors' => [
      '{{WRAPPER}} .elementor-image-box-subtitle' => 'margin-bottom: {{SIZE}}{{UNIT}};',
    ],
  ]
);

$this->add_control(
  'subtitle_color',
  [
    'label' => __('Color', 'elementor'),
    'type' => Controls_Manager::COLOR,
    'default' => '',
    'selectors' => [
      '{{WRAPPER}} .elementor-image-box-content .elementor-image-box-subtitle' => 'color: {{VALUE}};',
    ],
    'scheme' => [
      'type' => Schemes\Color::get_type(),
      'value' => Schemes\Color::COLOR_1,
    ],
  ]
);

$this->add_group_control(
  Group_Control_Typography::get_type(),
  [
    'name' => 'subtitle_typography',
    'selector' => '{{WRAPPER}} .elementor-image-box-content .elementor-image-box-subtitle',
    'scheme' => Schemes\Typography::TYPOGRAPHY_1,
  ]
);
Refresh the page and you will see new styling options in the ‘Style’ tab under Content Section.
Step 5: Add the HTML markup to display the subtitle on the page.
To modify the HTML that is being displayed as an output of the Widget, we need to make changes in the render() function.
Find the code below in the render function (around line no: 668)
if ( ! Utils::is_empty( $settings['title_text'] ) ) {
  $this->add_render_attribute( 'title_text', 'class', 'elementor-image-box-title' );
  ...
}
This code displays the title on the web page.
After that code, add the code below to render the subtitle:
if (!Utils::is_empty($settings['subtitle_text'])) {
  $this->add_render_attribute('subtitle_text', 'class', 'elementor-image-box-subtitle');

  $this->add_inline_editing_attributes('subtitle_text', 'none');

  $subtitle_html = $settings['subtitle_text'];

  $html .= sprintf('<%1$s %2$s>%3$s</%1$s>', $settings['subtitle_size'], $this->get_render_attribute_string('subtitle_text'), $subtitle_html);
}
Refresh the page and you will see the subtitle is being displayed.
Step 6: Add Javascript code.
This is our last step. You can see that if you make any changes to the text or styles of the subtitle, they are not reflected immediately.
This is because we have not added any Javascript to reflect changes immediately.
Find the code below in _content_template() function (around line no. 746).
if ( settings.title_text ) {
  var title_html = settings.title_text;
  ...
}
After that code, add the code below:
if ( settings.subtitle_text ) {
  var subtitle_html = settings.subtitle_text;

  view.addRenderAttribute( 'subtitle_text', 'class', 'elementor-image-box-subtitle' );

  view.addInlineEditingAttributes( 'subtitle_text', 'none' );

  html += '<' + settings.subtitle_size  + ' ' + view.getRenderAttributeString( 'subtitle_text' ) + '>' + subtitle_html + '</' + settings.subtitle_size  + '>';
}
Now if you go back and refresh the page, you will see the changes reflected immediately if you try to edit content or styles of the subtitle.
This is how your final output should look:

Conclusion
I know this was a long tutorial to follow. But once you understand the process for how you should modify the Elementor widget, it will become very easy for you to extend the Elementor the way you want.
Elementor also provides hooks if you want to add control or sections. But it doesn’t give you much flexibility in terms of adding the controls at specific locations. So I don’t prefer this option.
I hope you will be much confident in recreating an Elementor Widgets as per your design requirements.


Hello and thank you very much for this very clear tutorial ! Do you know if it is possible to do the same thing with elementor pro widgets? It seems different to me. (I'm not a developer but I'd just like to make a very small change on the testimonial slider to display pagination with dots and fractions instead of either). Thanks in advance.
I'm sorry for the late reply.
Yes it's the same thing to edit elementor pro. Are you using older version of Elementor?
Hi Durgesh,
I really want to learn how to do this! I've spent some hours trying to follow your procedure. Although I know some html and css, I don't know any php, so I'm still stuck at the top in steps 2, 3, 4. I think I've carefully followed the instructions, and have compared my files with the sample to see that what I've done mirrors yours, but my plugin is still causing fatal errors...
Would you be willing to provide a bit more detail for those three steps?
Thank you so much!
Violet
Hi Violet,
Sorry for the late reply. The fatal error should have a specific message about what's wrong.
Probably a missing semi-colon, or curly brace, or wrong variable name?