


Gutenberg at its core lacks features, but its simplicity is second to none compared to other WordPress page builders.
One way to cover that flaw is by utilizing custom block styles. This is powerful and easy to implement, yet most themes are not using this properly.
In this tutorial, we will cover how to create custom block styles and showcase how it can be used for a more complex design.
Step 1 – List What You Need
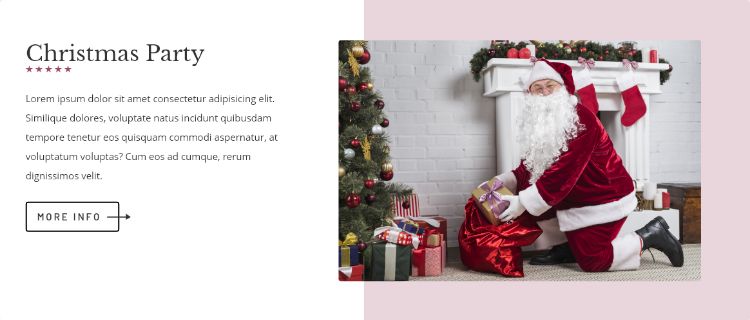
For example, we need to replicate this design:
According to that, let’s break down what Gutenberg doesn’t have yet:
- Media & Text block but with a square background behind the image.
- Heading block with five-stars decoration.
- Button block with only border and arrow pointing to the right.
So we need 3 custom styles, let’s register them.
Step 2 – Register Custom Styles
The code to add them is quite simple:
add_action( 'after_setup_theme', 'my_register_block_styles' );
function my_register_block_styles() {
register_block_style( 'core/media-text', [
'name' => 'half-bg',
'label' => __( 'Half Background' ),
] );
register_block_style( 'core/heading', [
'name' => 'stars',
'label' => __( 'Stars' ),
] );
register_block_style( 'core/button', [
'name' => 'outline-arrow',
'label' => __( 'Outline Arrow' ),
] );
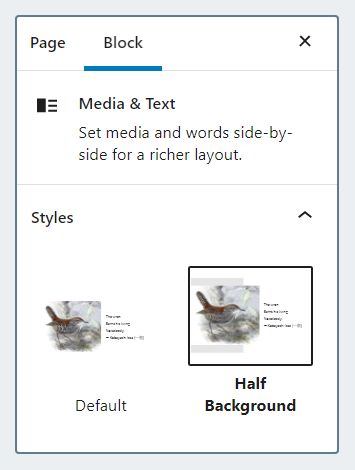
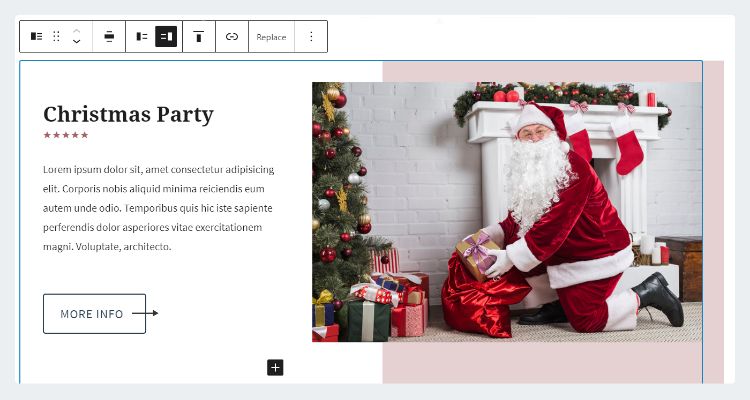
}Now when you create the respective block, you will see the Styles option on Sidebar:
Step 3 – Output Color Palette into CSS Variables
When we select a color in Gutenberg, it will apply extra classes to the wrapper. If the color name is accent, then it will add has-accent-background-color class.
How they handle that class name is up to the theme. Most of them do it like this:
.has-accent-background-color {
  background-color: #cd2653;
}

.has-accent-color {
  color: #cd2653;
}
The problem with the above is that the color is locked to that property. You can’t use it for something else like a border or in a :before pseudoselector.
It’s much more flexible if you output it as CSS Variables instead:
.has-accent-background-color {
  --bgColor: #cd2653;
}

.has-accent-color {
  --textColor: #cd2653;
}
To output those classes automatically, use the snippet below. It will read the colors defined in editor-color-palette and echo it inside <head>:
add_action( 'wp_head', 'my_output_gutenberg_palette' );
add_action( 'admin_head', 'my_output_gutenberg_palette' );

function my_output_gutenberg_palette() {
  // abort if in Admin but not inside Gutenberg editor
  if( is_admin() ) {
    global $current_screen;
    $in_editor = method_exists($current_screen, 'is_block_editor') &&
      $current_screen->is_block_editor();
    if( !$in_editor ) { return; }
  }

  $palette = get_theme_support( 'editor-color-palette' );
  if( !$palette ) { return; } // abort if no palette

  // format styles
  $styles = ":root .has-background { background-color: var(--bgColor); }
  :root .has-text-color { color: var(--textColor); } ";

  foreach( $palette[0] as $name => $value ) {
    $slug = $value['slug'];
    $color = $value['color'];

    $styles .= ".has-{$slug}-background-color { --bgColor: {$color}; } ";
    $styles .= ".has-{$slug}-color { --textColor: {$color}; } ";
  }

  echo "<style> $styles </style>";
}
With those variables ready, we can re-purpose the color such as using Heading’s background as the star’s color instead:
.is-style-stars {
  background-color: transparent !important;
}

.is-style-stars::before {
  content: "★★★★★";
  color: var(--bgColor);
}
Step 4 – Write CSS for Admin
One important tip for this is to be lazy. No need to perfectly match the design, as long as it has resemblance, it’s fine.
Also no need to factor in mobile responsiveness because the admin most likely uses a PC to edit the site anyway.
Now that we have the right mindset, here’s how to enqueue the CSS to Gutenberg:
add_action( 'enqueue_block_editor_assets', 'my_editor_assets', 100 );

function my_editor_assets() {
  $css_dir = get_stylesheet_directory_uri() . '/css';

  wp_enqueue_style( 'my-editor', $css_dir . '/my-editor.css',
    [ 'wp-edit-blocks' ], '' );
}
This will look different depending on the theme.
Step 5 – Write CSS for Frontend
This is where we should focus our effort in.
Start by copy-pasting the admin CSS. Then tune it according to the theme and finally add mobile responsiveness.
We can put this custom styling in existing CSS or create new one like below:
add_action( 'wp_enqueue_scripts', 'my_frontend_assets', 99 );

function my_frontend_assets() {
  $css_dir = get_stylesheet_directory_uri() . '/css';

  wp_enqueue_style( 'my-style', $css_dir . '/my-style.css', [] );
}Conclusion
You might get intimidated by how long the process for creating just 1 section. But remember that Step 3 and the enqueue process are one-time-only.
Once you learn once, it won’t take long. You’ll also be surprised at how seamless it is to convert the admin CSS into the frontend.
If you have any question regarding Custom Block Style, feel free to leave a comment below 🙂


Excellent article, many thanks for posting this! I was looking for information about how to re-use the background colour in a different part of a block - but even better for me, I was actually going to create the same layout (colour behind image, image pulling over into text-block), so you saved me a bunch of time!
One question - how do you change the style thumbnail? In your example, you have an alternative thumbnail for "Half Background" style, but I can't find any information about how to define this.
Hi Karl, thanks for reading
You can't change the thumbnail. It is automatically generated based on the Admin CSS. It shows up like that because I already have the CSS queued.
Before I have the Admin CSS, it should looks exactly like the Default
Oh, I never realised those thumbnails were using CSS, I didn't look at the editor styles properly. Now I have updated my editor-stylesheet and the style image is easier to understand.
One thing that wasn't quite clear to me when I first tested the code, was why it didn't use my background colour selections in the admin. Then I saw:
$palette = get_theme_support( 'editor-color-palette' ); if( !$palette ) { return; } // abort if no paletteand realised it only worked if I had a custom colour palette defined (which I didn't have). After changing that, everything worked fine.
Hello Henner, I have a follow-up question, perhaps you have some ideas.
I have just been testing the theme.json setup that came with WordPress 5.8, where the colour palette can be defined in the json file instead of using get_theme_support( 'editor-color-palette' ). Is it possible to still use your code, but modify it to work with this new setup?
Hi Karl, I haven't tested it, but I guess we can use file_get_contents() or wp_remote_get() to directly get the JSON file and read it.
Hi Henner, thanks for the pointers! I couldn't quite figure it out, so resorted to hard-coding the values.. not ideal, but at least it works!