

ACF (Advanced Custom Fields) is a plugin to create user-friendly custom fields. Visit their website to learn more.
ACF is very customizable, but we often overuse it. Not only it litters the database, it also makes our admin view complicated.
In this article, we will provide tips on how to tidy your ACF fields.
1. One for All
Depending on your content, a single WYSIWYG can represent multiple fields.
Let’s say we have 3 fields: Heading, Description, and Button. If you aren’t planning to do a special operation on individual fields, just combine them into a WYSIWYG.
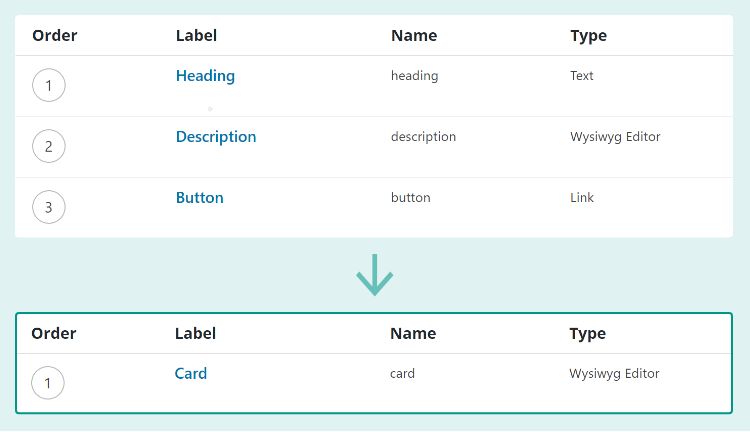
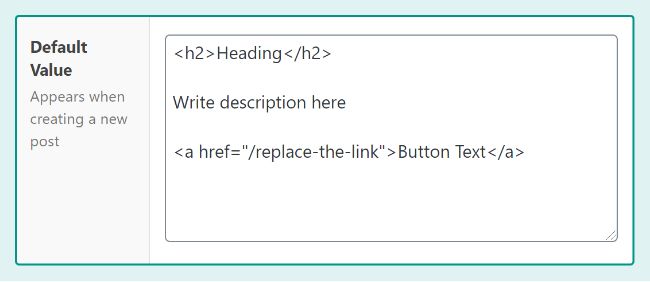
Then, add default value indicating the content placement:
2. Gallery as Pseudo-Repeater
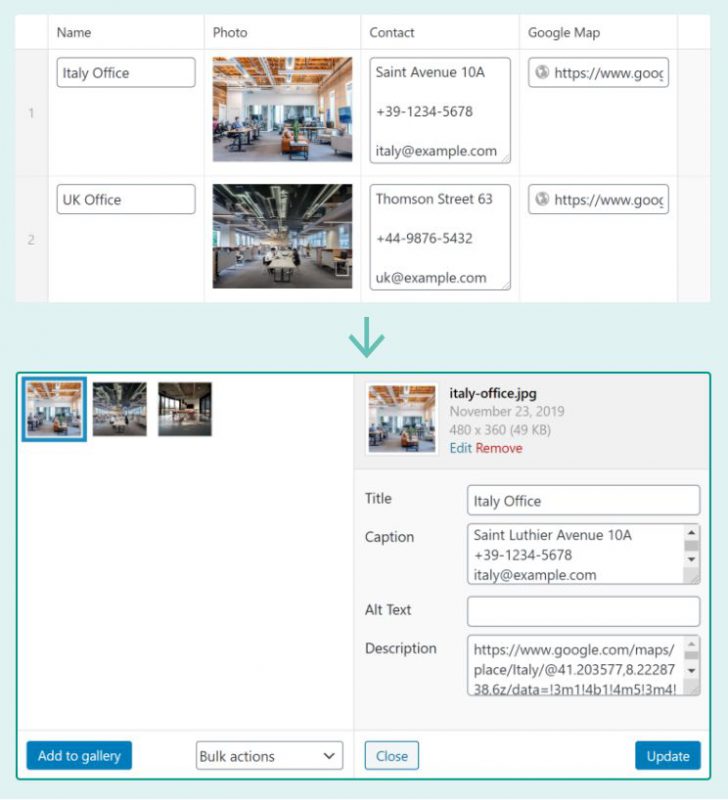
Repeater is a blessing in disguise. It’s flexible and easy to edit, yet it pollutes your postmeta table.
If you have a simple Repeater (1 image + few texts), you can get away by using Gallery and the image’s metadata.
Pictured below is an example of Branch Offices repeater that got converted into Gallery:
Then you need to adapt your template file:
<?php
// ...

$offices = get_field('offices');
if( $offices ): ?>
  <section class="offices">
  <?php foreach( $offices as $o ): ?>
    <address>
      <img src="<?php echo $o['sizes']['medium']; ?>"
           alt="<?php echo $o['title']; ?> Photo" >
      <h3>
        <?php echo $o['title']; ?>
      </h3>
      <?php echo wpautop( $o['caption'] ); ?>
      <a href="<?php echo $o['description']; ?>"> View in Google Map </a>
    </address>
  <?php endforeach; ?>
  </section>
<?php endif; ?>
3. Simplify Basic WYSIWYG
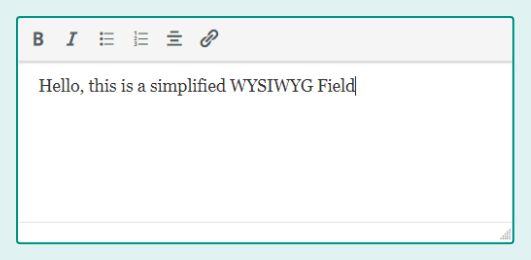
When creating a WYSIWYG field, you can change the Toolbar to be “Basic”. But it still has too many buttons on it.
The snippets below will control which buttons you want to show:
add_action( 'admin_enqueue_scripts', 'my_admin_assets', 100 );

function my_admin_assets() {
  $css_dir = get_stylesheet_directory_uri() . '/css';

  wp_enqueue_style( 'my-admin', $css_dir . '/my-admin.css' );
}
.acf-field-wysiwyg [data-toolbar="basic"] .mce-btn {
display:none; /* hide all buttons */
}
.acf-field-wysiwyg [data-toolbar="basic"] [aria-label*="Bold"],
.acf-field-wysiwyg [data-toolbar="basic"] [aria-label*="Italic"],
.acf-field-wysiwyg [data-toolbar="basic"] [aria-label*="Bulleted"],
.acf-field-wysiwyg [data-toolbar="basic"] [aria-label*="Numbered"],
.acf-field-wysiwyg [data-toolbar="basic"] [aria-label*="Align center"],
.acf-field-wysiwyg [data-toolbar="basic"] [aria-label*="edit link"] {
display:inline-block;
}
.acf-field-wysiwyg [data-toolbar="basic"] .mce-edit-area {
height:150px !important;
}Summary
My 3 tips to use ACF more efficiently:
- Combine multiple fields into WYSIWYG.
- Use Gallery as replacement of Repeater (if content is simple).
- Simplify the Toolbar in Basic WYSIWYG using CSS.
If you have any question or additional tips to share, please leave a comment below. I will definitely reply to you 🙂
Credit: Featured Image graphic by Pikisuperstar